Configure Static IP address to Cisco Layer 2 Switch or VLAN interface
Configuring a static IP address on a Cisco Layer 2 switch or VLAN interface is a straightforward process.
In this example, we'll assume you want to assign a static IP address to a VLAN interface on the switch.
We'll use the command-line interface (CLI) to demonstrate the configuration. Make sure you have console or SSH access to the Cisco switch.
Step 1:
Access the CLI
Connect to the Cisco switch using a console cable or SSH client (such as PuTTY). Log in with appropriate credentials to access privileged EXEC mode (enable mode).
Step 2:
Enter Global Configuration Mode
In the privileged EXEC mode, enter global configuration mode with the following command:
bash
enable
configure terminal
Step 3:
Create the VLAN (if required)
If the VLAN interface you want to assign a static IP address to does not exist, create it using the following command. Replace VLAN_ID with the desired VLAN number.
vlan VLAN_ID
Step 4:
Assign the IP Address to the VLAN Interface
Now, you can assign the static IP address to the VLAN interface using the following command.
Replace INTERFACE_NAME with the name of the VLAN interface (e.g., Vlan10), and IP_ADDRESS with the desired IP address along with the subnet mask (e.g., 192.168.1.1 255.255.255.0).
kotlin
interface INTERFACE_NAME
ip address IP_ADDRESS
Step 5:
Enable the VLAN Interface
Enable the VLAN interface using the following command:
kotlin
interface INTERFACE_NAME
no shutdown
Step 6:
Save the Configuration
Once you have assigned the static IP address to the VLAN interface, it is essential to save the configuration to ensure it persists after a reboot. Use the following command to save the configuration:
Want to Earn daily 500 to 800 USD
by selling High demand &
Ultra modern and novel Gadgets online ?
arduino
write memory
Your Cisco Layer 2 switch or VLAN interface now has a static IP address assigned to it.
You can verify the configuration using the show ip interface brief command, which will display the interface along with its IP address and status.
Please note that the specific commands and syntax may vary slightly depending on the Cisco switch model and software version. Always refer to Cisco's official documentation for your particular device to ensure accurate configuration.
Assign ip address to switch or assign ip address to vlan
We will demonstrate on how to assign an ip address statically to cisco layer 2 switch.
You can assign ip address to a cisco layer 2 switch by using the virtual interfaces (VLAN interfaces) not physical interfaces, by configuring ip address to the vlan interface as shown in following commands.
London(config)#int vlan 1
London(config-if)#ip address 192.168.10.10 255.255.255.0
London(config-if)#no shutdown
London(config-if)#ip address 192.168.10.10 255.255.255.0
London(config-if)#no shutdown
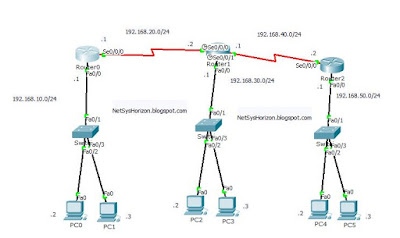
Looking at the above diagram, we assigned ip address 192.168.10.10 to the cisco switch0, after that Router0 that has ip address 192.168.10.1 can ping to the cisco switch.
Router0#ping 192.168.10.10
!!!!!
Note that vlans are identified with a number from 1 to 4094 when the enhanced software image is installed and 1 to 1005 when the standard software image is installed.
-------------------------------------------------------------------------------------------------
Learn More...
Want to Earn daily 500 to 800 USD
by selling High demand &
Ultra modern and novel Gadgets online ?


No comments: