Woodworking Construction Project - Bird feeder full project with Construction Details
How to make Bird feeder? Here Presenting, Woodworking Construction Project - make Bird feeder DIY full project with Construction Details.
What do you do if you have no convenient tree from which to hang your bird feeder?
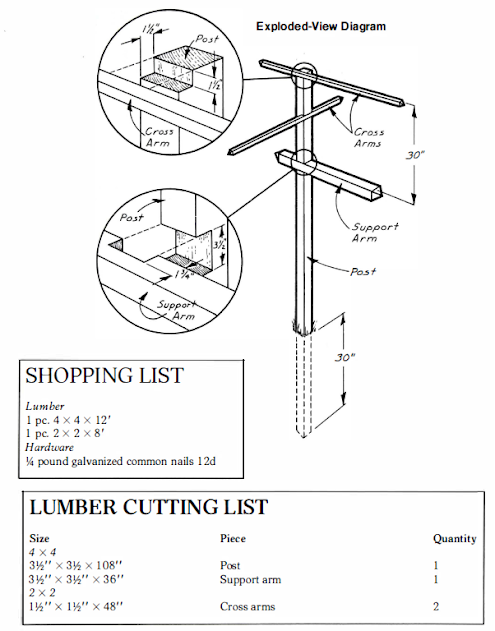
Build this simple artificial one! The Rodale Design Group came up with the idea and it works wonderfully. You may make yours the same as the one shown here or change the configuration of the support arm and cross arms to suit your individual taste.
Naturally, you may add more arms, as desired. The bird-feeding station pictured IS made of pressure-treated pine. Cedar or redwood-both of which are durable in outdoor applications - is a good alternative.
CONSTRUCTION details of bird feeder
1. Cut one piece of 4 X 4 (3Y2" X 312" ) stock to 1 08 inches for the post. Cut a second piece of the same stock to 36 inches for the support arm.
2. Cut two pieces of 2 X 2 (1 Y2 " X 1 Y2") stock to 48 inches each for the cross arms.
3. Lay out and cut a half-lap joint in the post and support arm where they intersect, as shown in the exploded-view diagram. To lay out the joint, place the support arm at a right angle across the post, exactly as it wil be in its finished position. Scribe the width of each piece onto the piece it rests against, and also mark the depth each notch should be: one-half the thickness of each piece. Remove the waste wood between the scribed lines of each piece using a circular saw, or handsaw and chisel.
4. Cut a 1 Y2-inch-deep notch 1 Y2 inches wide across the end of the post nearest the notch cut in the previous step. The two notches should be parallel, as shown in the exploded-view diagram.
5. Halfway between the two notches in the post, cut a third notch (actually a dado) at a right angle to them, as shown in the exploded-view diagram. Like the notch at the end of the post, this notch should measure 1 Y2 inches deep by 1 Y2 inches wide and extend across the full thickness of the post.
6. If you wish, miter all four faces of the support arm and both cross arms to form points at each end.
7. Sink the post into the ground to a depth of approximately 30 inches. (Be sure not to sink the notched end!) Repack the soil firmly around the base of the post.
8. Fasten the support arm and cross arms to the post in the locations shown in the exploded-view diagram. Use 1 2d galvanized common nails.


No comments: