Angular & TypeScript from Basic to Advanced plus Live Project

November 18, 2021

 Angular & TypeScript from Basic to Advanced plus Live Project


Learn all features of Angular (with TypeScript) and eventually perform CRUD operations using Angular and Web API

Created by Sandeep Soni

What you'll learn
  • Build real-world Web applications with Angular 4

  • Master the best practices of Angular.

  • Tools and tips to debug and troubleshoot errors.

Course content

25 sections • 53 lectures • 18h 29m total length

Requirements

  • Basic Knowledge on JavaScript is essential. Visual Studio Code or any other IDE of your choice.

  • You don't need to familiar with Angular 1

Description

The course enables you to master front-end web development with Angular 4. It helps you gain in-depth knowledge of concepts.

This Course is compiled by Mr. Sandeep Soni, Microsoft Certified Trainer with experience over 21 years.

Mr.Sandeep has worked closely with many IT companies and helped them with their technology resources training needs. He considers this to be the best part of his profession and he enjoys the most because he gets to meet new people; get involved in the ever changing technology needs and provide them with optimum solution to the problems they face in application development. This is how he keeps himself updated with the latest technology in the industry

He is always accessible to all his students anytime for any kind of question they may have. 

We also have a new course for Angular, named "Angular7 and TypeScript - Complete course". You can go through its Curriculum and decide which course would be beneficial for you.

By the end of this course you should able to

  1. Understand importance of Angular and its key features.

  2. Learn about the Angular Library and MVC framework

  3. Create Controllers and share data between Controllers

  4. Dependency Injection Concepts

  5. Learn Custom Directives, Filters and overview of Creating Routes

  6. Description of Angular Modules

  7. Deploy Validations and Business Logic in Controllers

  8. Integrating Angular with MVC Web API

  9. Work on real-time AngularJS 4 applications

Who this course is for:

  • Front-end developers who want to stay up-to-date with the latest technology
  • Back-end developers who want to learn front-end development and become full-stack developers

TypeScript has had some changes since this class was created and the code in the video would not run with the current version of TS without modifications. The class Hello requires these changes:

class Hello {

FirstName!: string;

LastName!: string;

SayHello = function (this: Hello) : string {

return "Hello " + this.FirstName + " " + this.LastName;

}

}

Thankfully it was easy to find the solution, and the video should be updated to reflect the changes. Also, although semicolons are not required in most places, it's still best practice to use them in my opinion, and I'm not sure why semicolons were used in some places and omitted in others. Besides that, the video was good and I look forward to the rest of the course.




Woodworking Construction Project -Garden chair full project with Construction Details

November 10, 2021

 Woodworking Construction Project -Garden chair full project with Construction Details

Woodworking Construction Project -Garden chair full project with Construction Details

Garden chair full project with Construction Details

This simply constructed but elegant garden chair was created by the Rodale Design Group with outdoor use in mind. 

However, after a few test models had been built, particularly the double-width version pictured, we decided that this chair would make an attractive and comfortable piece of indoor furniture as well. 

The smaller, outdoor chair - which is the one described in the instructions - is made inexpensively of construction-grade pine covered with two coats of exterior latex enamel.

Set out on a porch, under a rose arbor or a favorite shade tree, it provides a sturdy, pleasant place to sit back and enjoy the surroundings. The indoor chair is made of mahogany, finished clear,

using polyurethane. Its size is twice that of the smaller one. To build it, merely add a third rail to each pair of front and back rails, and increase the lengths of all the slats and stops.

A novel feature of the garden chair is the way in which it is assembled. No hinges, bolts, or other fasteners are used. The slatless portion of the seat rails merely slides into place between the two wooden stops attached to the back rails, until the bottom slats of both the seat and the back come together. The chair supports itself in this position, yet may be pulled apart easily
for storage or transportation.

CONSTRUCTION of Garden Chair


1 . Cut two pieces of 2 X 6 ( 1 Y2 " X 5 Y2 " ) stock to 39Yz inches each for the back rails.

2. Cut the back rails to proper shape using the grid provided in illustration A.

3. Cut two pieces of 2 X 6 stock to 35Yz inches each for the seat rails.

4. Cut the seat rails to proper shape using the grid provided in illustration A.

5 . Cut 20 pieces of 1 X 2 ( % " X Biz " ) stock to 23 inches each for the seat and back slats.

6. Cut two pieces of 1 X 2 to 1 8 inches each for the stops.

7. Cut a 􀁄-inch radius along all edges of the rails and slats and along the four long edges of each stop. Use a router equipped with a 0.25 inch rounding-over bit.

8. Clamp the back rails together with their ends and edges flush. Square a line across
the inside (concave) edge of both pieces every 2 inches, measuring from the top
end, until you have drawn 1 1 lines. These lines mark the position for the back slats.

9. Un clamp and spread the back rails 18 inches apart, outside edge to outside edge,
with their concave edges up. Attach 12 back slats to the rails with waterproof  glue and 6d finishing nails. Center each slat so that it extends 212 inches to the outside of each rail. Make the top edge of the first slat flush with the top ends of the back rails. Position the remaining back slats so their top edges are flush with the lines drawn across the rails .

10. Clamp the seat rails together with their ends and edges flush. Square a line across
the inside (convex) edge of both pieces every 2 inches, beginning from the front
end, until you have drawn seven lines. These lines mark the position for the seat
slats .

Woodworking Construction Project -Garden chair full project with Construction Details


11 . Unclamp and spread the seat rails apart so that they measure 1 4% inches outside
edge to outside edge. Fasten eight slats to the seat rails with waterproof glue and 6d
finishing nails. Center each slat so that it extends 4Ys inches to the outside of each rail. Position the first slat with its front edge flush with the front ends of the seat
rails. Position the remaining slats with their front edges flush with the lines drawn
across the rails.

12 . Position one stop 2'Ys inches below the bottom slat of the back rail, its ends flush with the outside edges of the rails. Fasten the stop to the rails with waterproof glue and 6d finishing nails.

13 . Position the other stop on the rear side of the back rails, so the ends of the stop are
flush with the outside edges of the rails, and the stop's bottom edge is 1 5 inches
from the bottom ends of the rails, measured along the curve. Fasten this stop
to the rails with waterproof glue and 6d finishing nails.

14. Set all nails and fill the holes with wood filler. When the filler is dry, sand the entire
chair, then finish with two coats of exterior grade enamel or polyurethane. 


Woodworking Construction Project -Garden chair full project with Construction Details


Woodworking Construction Project - Bird feeder full project with Construction Details

November 09, 2021

Woodworking Construction Project - Bird feeder full project with Construction Details

woodworking construction full project

How to make Bird feeder? Here Presenting, Woodworking Construction Project - make Bird feeder DIY full project with Construction Details.

What do you do if you have no convenient tree from which to hang your bird feeder? 

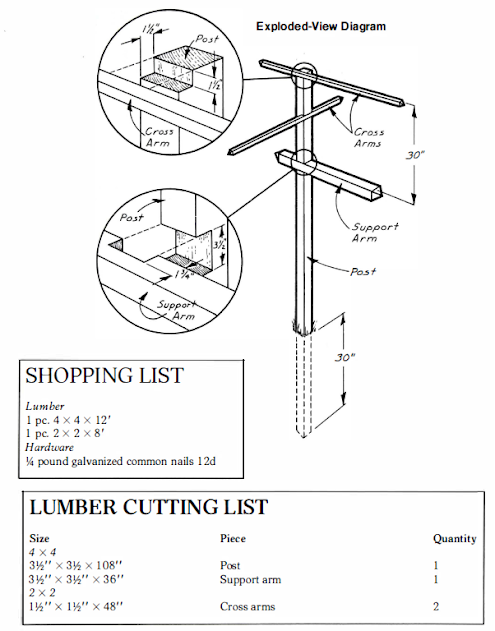
Build this simple artificial one! The Rodale Design Group came up with the idea and it works wonderfully. You may make yours the same as the one shown here or change the configuration of the support arm and cross arms to suit your individual taste. 

Naturally, you may add more arms, as desired. The bird-feeding station pictured IS made of pressure-treated pine. Cedar or redwood-both of which are durable in outdoor applications - is a good alternative.


CONSTRUCTION details of bird feeder

 1. Cut one piece of 4 X 4 (3Y2" X 312" ) stock to 1 08 inches for the post. Cut a second piece of the same stock to 36 inches for the support arm. 

2. Cut two pieces of 2 X 2 (1 Y2 " X 1 Y2") stock to 48 inches each for the cross arms. 

3. Lay out and cut a half-lap joint in the post and support arm where they intersect, as shown in the exploded-view diagram. To lay out the joint, place the support arm at a right angle across the post, exactly as it wil be in its finished position. Scribe the width of each piece onto the piece it rests against, and also mark the depth each notch should be: one-half the thickness of each piece. Remove the waste wood between the scribed lines of each piece using a circular saw, or handsaw and chisel. 

4. Cut a 1 Y2-inch-deep notch 1 Y2 inches wide across the end of the post nearest the notch  cut in the previous step. The two notches should be parallel, as shown in the exploded-view diagram. 

5. Halfway between the two notches in the post, cut a third notch (actually a dado) at a right angle to them, as shown in the exploded-view diagram. Like the notch at the end of the post, this notch should measure 1 Y2 inches deep by 1 Y2 inches wide and extend across the full thickness of the post. 

6. If you wish, miter all four faces of the support arm and both cross arms to form points at each end. 

7. Sink the post into the ground to a depth of approximately 30 inches. (Be sure not to sink the notched end!) Repack the soil firmly around the base of the post. 

8. Fasten the support arm and cross arms to the post in the locations shown in the exploded-view diagram. Use 1 2d galvanized common nails.  

More wood working Projects


ads 728x90 B
Powered by Blogger.